Stocks Home Inspection

"Where Experience Meets Technology"

7 West Square Lake Rd
Bloomfield Hills, MI 48302
(313) 377-6967
Mon-Sat 9:00am-7:00pm

  • Home
  • Home Inspection Services
    • Home Inspection
    • Mold Testing
    • Radon Gas Testing
    • Termite Inspection
    • Thermal Imaging
    • Indoor Air Quality
  • Schedule Appointment
  • Download Report
  • My Qualifications
    • Code of Ethics
  • About US
    • Customer Reviews
    • Blog
    • Service Areas
  • Standards of Practice
  • clay-roof-home
  • thermalbanner
  • thermalimaging
  • environmental-testing
  • inspector-guy
  • detroit-area

Ice dams: how they form, quick fixes, and prevention

February 23, 2021 By StocksHomeInspection

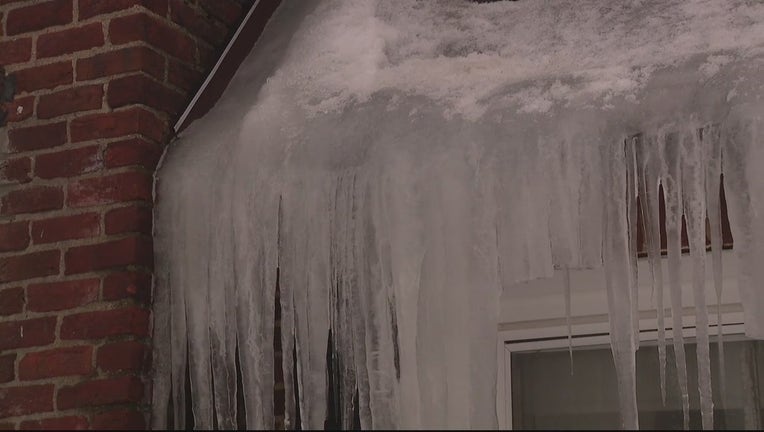
Removing ice dams from your home can save you money for years to come

As the snow melts away from your roof, it’s likely going to start piling up on the edge of your home. You need to solve that problem fast before it becomes an even bigger one.

“AAA never recommends that homeowners get up on the roof and shovel snow off,” Michalak said. “And when utilizing a roof rake, keep in mind that you are pulling snow off the roof. Make sure no one is underneath the location you are working on and that there is no fragile vegetation or objects that can be damaged by the weight of the falling snow. Always watch out for overhead power lines when doing any type of home maintenance and stay away from that area.”

If you have a leak inside your attic, aim a box fan at the leak and the cold air will freeze it in minutes. This prevents more water from coming in as you address the problem outside.

How do to get rid of ice dams in gutters

With the snow out of the way on your roof, the above-freezing temperatures will help melt the ice.

If you want to speed up the process, you can create a channel for the ice to travel down. There are products that you can toss on the roof and, while they work, they can be harmful to your plants or soil once they wash away.

Instead, get an old pair of pantyhose and fill it with calcium chloride (aka rock salt), and tie it off. Then lay the filled pantyhose across the dam so it overhangs the gutter and creates a channel for water to flow through. 

This will keep the water moving without leaking chemicals into your grass.

How to prevent ice dams

Of course, the best thing to do is prevent it so that when the snow melts, you can watch it from the comfort of your couch and rest easy.

Remember how heat from the attic melts the snow? That’s a great spot to start to prevent this.

Increase ventilation through the use of soffit, gable, and ridge vents. Moving air helps circulate air through the attic to ensure a consistent temperature.

Check your insulation – is it blocking any vents? Is it deep enough? you may need more to keep the heat from the inside of your house from escaping to your roof.

Quick tip: improving your insulation will also save you money on your gas or electric bill as it should be cheaper to heat your home.

If you’ve still got ice dams or want a cheaper solution than blowing insulation, heated cables work as well. You can line them along the first three feet of your roof and plug them in to heat up before the snow. This will prevent snow from stacking up at the edge of your house and over the eaves.

Filed Under: Home Maintenance Tips, Uncategorized

How To Prepare For A Home Inspection When Selling

March 21, 2019 By StocksHomeInspection

Win A Home Inspection With These 13 Tips

After months of sitting on the market, you finally have a family interested in buying your home. Now, you have to pass the dreaded home inspection.

Home inspections sound scary, but they are necessary before any sale. Needless to say, there are always tips and tricks to pass any inspection. Therefore, I have come up with 13 easy tips for winning your next home inspection. If you complete each recommendation, you can rest assured that your home will pass the inspection and sell before you know it.

1. Be Honest with Inspector

First off, the home inspector should ask if there are any major issues with the home. Be honest and tell them what you know. They will find the issue either way. Worst-case scenario, they find an obvious issue and tell the potential buyers. The buyers now see you as a dishonest seller and may reconsider, even if the home passes the inspection. As always, it’s better to be honest up front.

Check Gutters

2. Check Roof and Foundation

These are two budget killers when it comes to home improvement. Before the inspection, check your roof and foundation. If there is a doubt that something is wrong (like a leak in the roof), you should call a local contractor to come have a look. They can estimate the cost of the repair and see if it’s a big issue or not. By having this done before the inspection, you are saving the potential buyers a huge worry.

3. Check Drainage

Your roof plays a key role in your drainage. If faulty, poor drainage can ruin your foundation. In fact, poor drainage is the No. 1 problem home inspectors find.

Make sure your downspouts lead water away from the home. They should be thick and long enough to handle large amounts of water. Especially in areas of heavy rainfall, downspouts of 3X4 inches are highly recommended. If your current downspouts are not meeting these basic guidelines, you should think about extending them, a simple DIY project.

4. Remove Clutter Around the Home

Sometimes, a happy home inspector can make all the difference. Therefore, make sure it’s easy to move freely about the home. If you have heavy boxes in front of the attic or around the furnace, move them before the inspection. Clutter can’t hide home issues, but it can certainly make for an unhappy inspector and longer examination.

5. Make Sure Floors are Even

Get up to 4 Free Quotes!

Sometimes, the smallest crack can cause uneven floors. To test it out, use the age-old tactic of rolling a marble. If it moves, it’s uneven.

While this could signal a larger foundation issue, oftentimes, it’s just the design of an older home or a rotten joist/subfloor. Like the roof, I recommend getting an estimate for the fix. Repairs could run as low as $300, but according to our floor repair cost estimator, expect to pay somewhere around $750 to repair your floors.

If your project isn’t too expensive, fix the issue before the home inspection.

Monitor Exterior

6. Monitor the Exterior

Homeowners care about their curb appeal and that means the home inspector will examine the exterior as well. They will look at the landscaping, grading, driveways, fences, windows and sidewalks. Other than a major grading or driveway issue, all these issues can be fixed yourself. Do yourself a favor and make sure your home’s exterior looks better than ever.

7. Check Electricity

While I highly recommend hiring a professional electrician to check the entire house, there are small fixes you can make. First off, organize the wiring if it’s visible. Then, make sure all light bulbs are changed. If one is out, an inspector or potential buyer could attribute it to faulty wiring. Repairing an electric system can get expensive for some, but make sure your circuit breaker, light fixtures and all wiring are up to code.

8. Provide Documentation for Repairs & Maintenance

If you’re going through all this work to pass a home inspection, you want potential buyers to take notice. When it comes to big, expensive projects like fixing a roof or repairing an electric system, buyers need proof. Therefore, after you fix or repair anything in your home, keep the receipt. This way, even if the home inspector does find an issue, you can go back to the contractor and find a reasonable and inexpensive solution.

9. Check HVAC

Winters are getting colder and gas prices are rising. It’s more important than ever to have an efficient HVAC system. The home inspector will look at your furnace, boiler, heat pump and/or air conditioner. They will make sure the heat or air is reaching its intended location and not exiting the home.

If you believe your HVAC is working great and your home inspector says something is faulty, show them your utility bills. If they’re about average for the area, chances are, your HVAC is working just fine.

10. Make Sure Home is Insulated

Speaking of HVAC, ventilation and insulation can create higher gas bills and other HVAC-related issues. First, go up to your attic (if you have one) and make sure there is enough padding and insulation. Some may fall off or wear down over the years. Inspectors will notice, so make sure you fix it right away. Then, go around your house and make sure no air is entering the home. Whether you have to caulk your windows or tighten the door hinges, make sure no air is entering or leaving the home.

11. Empty Appliances

This may seem like a very minor detail, but just like removing the clutter, homeowners should empty the dishwasher, laundry and clean the stove before any home inspection. They will check all these appliances and no one wants to touch dirty clothes or pots (especially when they are not yours).

12. Check the Garage

Whether you use your garage for storage or actual parking, you want to make sure your garage door and all the lights are working correctly. Fixing a garage door is not expensive and if it is broken, the buyers will insist on you fixing it.

13. Go Away & Take the Kids

Home inspectors need to be honest with the potential buyers and they’ll feel much more comfortable with the seller out of the home. Additionally, the buyers should be comfortable asking the inspector anything they wish. You can bet they’ll feel safer with the sellers out of the home.

Conclusion

While some of these tasks may require the help of a professional, others are very simple and easy DIY tasks you can accomplish. Once completed, you can rest assured knowing your house will pass any home inspection.

Filed Under: Home Inspection Advice, Uncategorized

The 5 Biggest Mistakes to Avoid When Buying Your First Home

January 31, 2019 By StocksHomeInspection

Buying a home can be an anxiety-ridden process, and that potential anxiety gets amplified for anyone who’s embarking on homeownership for the very first time. There’s so much to do and so much you don’t know that “being overwhelmed” hardly seems like an appropriate description of how it feels.

And even though you don’t want to scare yourself away from the entire process, you still need to be wary of falling into a few common traps that first-time buyers generally don’t avoid. If you’re aware of these five potential mistakes — and able to keep yourself from making them — then you’ll be saving yourself some significant stress on your home buying journey.

MISTAKE NO. 1: NOT UNDERSTANDING YOUR DOWN PAYMENT OPTIONS

The biggest headache for so many first-time buyers is the down payment. If you’ve ever bought a car, then you’re probably familiar with the concept — it’s money that you contribute to the total cost of the purchase.

A down payment of just a couple thousand dollars can get you a head start on your car. If you don’t have a certain amount to put down on your home loan, however, you might find yourself paying private mortgage insurance (PMI) on the lifetime of the loan. Depending on your credit score, the bank and other factors, PMI could cost between 0.5 percent to 1 percent of the total loan amount.

Most banks require at least a 20 percent down payment before they will waive the need for PMI on the loan. And most homes in this area cost about $300,000, so that means a buyer would need to bring $60,000 to the table in order to avoid PMI.

However, there are loans that allow you to put as little as 3 percent down on the home ($9,000 for a $300,000 home), which is much more reasonable for a first-time buyer, especially if you can accommodate the annual cost of $1,500 to $3,000 in PMI into your monthly payment amount. And veterans could be eligible for zero-down loan programs with no PMI through the Veterans Administration (VA) loan program, so that’s something else to think about.

There’s one more thing to know about down payment options: Some government organizations and lenders try to incentivize first-time homeownership by offering free down payment grants or loans to qualified buyers. Depending on your age, income level, credit score and other factors, you could qualify for free money to wrap into your down payment; a full rundown of programs is available at downpaymentresource.com.

MISTAKE NO. 2: NOT GETTING PREQUALIFIED FOR A LOAN

Between the amount of money you plan to put down on the home, the potential PMI and other cost factors, your monthly cost could be significantly more (or possibly less) than some of those calculators will show you online.

So before you trust those “estimated monthly mortgage loan amount” numbers that you see popping up next to your potential new dream home on Realtor.com, Zillow or a brokerage website, it pays to figure out what you can actually afford — and that means getting prequalified for a home loan.

This means you will need to talk to a mortgage loan officer and submit a slew of documentation, from your monthly pay stub to your credit score, in order for that loan officer to tell you how much money you can get for your home loan. It’s a little bit painful, but the prequalification letter you’ll get as a result is much more credible than a quick qualification you can pull up on an app — and that means sellers will take it more seriously when it comes time to put in an offer. You’ll have to qualify for a loan eventually anyway, so why not get the painful part out of the way?

Be careful: A bank might approve you for a loan amount that’s realistically more debt than you can carry month-to-month. Consider that you’ll need to pay homeowners’ insurance, taxes and possibly flood insurance on your new property or PMI on your loan, and try to make sure you’re not setting yourself up for a total monthly payment that’s more than about one-third of your household’s take-home pay.

Not only will this help you set your price range for the search stage, but it will also give you confidence that you — yes, you! — can be a successful homeowner someday soon.

MISTAKE NO. 3: NOT FINDING A QUALIFIED REAL ESTATE PROFESSIONAL 

It’s so easy to find homes online these days that you may wonder why a real estate professional is even necessary. After all, isn’t the hard part — finding the place you want to buy — something you can do yourself?

Well, maybe. But the process of buying and selling a home is filled with 100’s of details that need to be planned for and navigated to a successful outcome. Not to mention areas with competitive markets where you’re probably not seeing the most updated listings — that home you just fell in love with online might be under contract before you can set up a time to tour it.

Not only can a real estate professional make sure you have access to listings the second they hit the MLS, but a licensed real estate professional can also provide expertise on the area where you want to move. Whether that’s feedback on who can help you with homeowners’ insurance quotes to warnings about some of the challenges of owning a home in that particular area, you want to work with an honest professional dedicated to protecting your interests and those of the public. 

A real estate professional is an invaluable resource.

Here are some questions to ask any real estate professional you’re interviewing:

  • How long have you sold real estate?
  • How long have you sold real estate in this neighborhood in particular?
  • What can you tell me about the energy options in the area?
  • What else should I know about utilities, like water/sewer and other amenities?
  • What do other clients who have moved here like about the area? What don’t they like?
  • What do people in this area like to do for fun? What are some popular weekend activities?
  • What can I expect about the buying process? What steps should I be especially aware of, and how will we stay in communication?

A real estate professional who’s an area expert should have no trouble answering the lifestyle questions, and a real estate professional who’s a transaction-management ace can help you understand exactly what you’re in for, how long it’s likely to take and what rewards await you at the end of the tunnel.

MISTAKE NO. 4: NOT SPENDING THE NIGHT IN THE NEIGHBORHOOD

If it’s at all possible, see if you can find an Airbnb or another vacation-rental type of setup where you can crash for a night or two — preferably closer to a week — so you can try your new neighborhood on for size.

Is an 8 a.m. arrival time at work still reasonable with this neighborhood’s commute? This is an opportunity for you to start navigating your way around public transportation or new routes to work so you know exactly what you’re signing up for.

Where are the closest grocery stores, parks, rec centers and hiking trails? Figure out where you’re going to shop and work out, and where you can spend time outside walking the dog or enjoying nature. That way you won’t kick yourself later for realizing too late that something you really value isn’t available.

And what are the overnight noise levels like, anyway? If there’s a train that rolls through town in the early hours of the morning, you’re near a highway or a flight path — and any of that is going to disturb you — then it’s best to figure it out before you’re spending your first night in your new home and wake up to unpleasant (and unexpected) noises. 

At the very least, you can learn enough about the neighborhood to know how close to (or far away from) the bus line you need or want to be and target your home search accordingly.

MISTAKE NO. 5: NOT UNDERSTANDING WHAT’S FIXABLE AND WHAT’S A DEAL-BREAKER

Those drop panels in the ceiling are hideous, and you can’t imagine how anyone can fit into that minuscule bathtub.

Are those annoyances that can be fixed or deal-breakers that mean you should pass on the property entirely?

This is another area where a good real estate agent can help. They see so many houses in various stages of repair and updating that they can show you where you can claim another foot or two for bathtub space (and help you figure out how much it will cost and who’s trustworthy enough to take on the job) or let you know that the ceilings are too low for any changes to make much of a difference. They can also give you an idea of what’s up to code and what simply won’t pass an inspection in 2017, so you know what concessions to request as soon as you’re ready to make an offer.

In markets where entry-level homes are getting snatched up as soon as they hit the market, knowing what’s acceptable and what you just can’t take is a huge advantage — it’ll help you make a decision, with confidence, on the fly.

None of these mistakes will keep you from buying a home of your own — but they could delay the process and cost you hundreds (if not thousands) of dollars at the end of the day. But if you’re able to avoid them, you’ll be signing the closing papers on your dream home before you know it!

Filed Under: Home Inspection Advice, Uncategorized

Recent Posts

  • Ice dams: how they form, quick fixes, and prevention
  • How To Prepare For A Home Inspection When Selling
  • The 5 Biggest Mistakes to Avoid When Buying Your First Home
  • Detroit Residents Attend Homeowner Workshop
  • NACA Home Ownership Program

Categories

  • Air Quality Remedies
  • Home
  • Home Inspection Advice
  • Home Inspector's Thoughts
  • Home Maintenance Tips
  • Ownership
  • Uncategorized
  • Words of Advice

Copyright © 2023 Stocks Home Inspection Privacy Policy